Share Button

This post will highlight the performance improvements in the Sitecore Publishing Service v2; covering the utilization of the hardware resources, the speed of the publishing process, and the mitigation of network latency.

The new Sitecore Publishing Service brings massive performance improvements to customers compared to the old publishing. The publishing component was completely redesigned with the following performance goals in mind:

Efficiency in Consuming Hardware Resources

The more efficient the service is, the cheaper it is to run on the cloud. The new publishing service consumes as little CPU and Memory as possible. A considerable amount of effort has been invested in making sure that the code is efficient; this included multiple iterations of CPU and Memory profiling, re-designing and refactoring the code to make it as efficient as can be. This led to many optimizations such making sure that the service releases any unused references as early as possible. The service is even clever enough to de-reference duplicate string objects stored in each item such as language strings (e.g. “en”), so that only one object is referenced. Such optimizations have massively decreases the memory footprint.

The publishing service has been load tested using a large dataset that included over than 1 million item variants (languages and versions).

The CPU usage was about 17% and the memory usage didn’t exceed 400mb.

Speeding Up the Publishing Process

One of the main differences between the new and old publishing is the data layer. Unlike the old publishing, the publishing service doesn’t talk to the databases via the Sitecore item APIs. However, it uses its own data layer, which only performs databases operations in bulks. The bulk operations improve the performance dramatically by mitigating the network latency problems (see the next section).

Another difference is that most of the processing in the publishing service is done in parallel/pipelined approach. For example, while a batch of items is being evaluated for restrictions, another batch is being retrieved from the database at the same time.

The new publishing service also utilizes in-memory indexed trees, which capture the state of the source and target databases at the start of each publish job. Those indexes allow the service to do as much work as possible efficiently (in memory) without talking to the database.

Read More From Hours to Seconds – The Awesome Performance of Sitecore Publishing Service V2

publishing Sitecore

Share Button

There are different reasons to encourage developers to use Entity Framework (EF) Code First, the most important reasons to me are the ability to version control the database schema and the database migration feature which creates/updates the database schema from the code-base model.

Check this link for more information about the EF Code First.

If the migration feature is used, your application will check if the database has the latest schema – typically on app start up. The schema then might get updated to accommodate the new changes such as adding new table or fields to the database.

Assume that you’ve got a Sitecore multi-instance  environment that uses a custom database managed by EF Code First, e.g. an error logging database. The custom database is accessible from every Sitecore instance in the environment. Also, assume that the environment is setups and you want to add a new field to the database to log extra information such as the machine name.

In entity framework, you’ve got two options to implement your migrations. Manual Migration or Automatic Migration; the former allows you to specify the migration steps and will give you the ability to customize the migration process as well. The latter works like magic, where EF automatically detects the schema changes and does the migration if needed. Both methods will store the migration information in the __MigrationHistory table.

Read More How to Achieve Zero-Downtime Sitecore Deployments (EF Automatic Migrations) – Part III

Entity Framework Scalability Sitecore

Share Button

A simple architecture was proposed in Part I of this article to avoid down times during the Sitecore content and code deployments. In this article, the deployments problems related to search is discussed and a potential solution is illustrated.

What search technology to use?

A straight forward answer is .. NOT Lucene. Although it’s the default search provider for Sitecore, it doesn’t do well within a multi-instances environment as the instances of the index will often go out-of-sync. Other search providers can be use such as SolrCoveo for Sitecore and Elastic search. Each of these technologies may require different setup/configuration to achieve the goal of this article.

The rest of this article is based on Solr – as it’s currently the alternate search technology provided by Sitecore – showing what the potential problems are and how to avoid these problems.


What part of the search can cause downtime during deployments?

Two things can go wrong here:

1. Solr configuration updates

If you implemented a new feature in your website that requires a Solr configuration updates (e.g. auto complete using NGram or “Did you mean …” spellchecking) then you have to be very careful about they way of pushing the schema/config updates to the Solr server.

One mistake that developers do is restarting the Solr server to force it to read the new updates. Once the service is restarted, Sitecore will immediately show the yellow screen of death and the site will go down till the Solr server is up and running again.

Thankfully, Solr has a very helpful feature – Reload – that allows loading the config updates without causing downtime. Here is a quote from the Solr wiki pages describing the Reload function

Load a new core from the same configuration as an existing registered core. While the “new” core is initalizing, the “old” one will continue to accept requests. Once it has finished, all new request will go to the “new” core, and the “old” core will be unloaded.

  • http://localhost:8983/solr/admin/cores?action=RELOAD&core=core0

This can be useful when (backwards compatible) changes have been made to your solrconfig.xml or schema.xml files (e.g. new <field> declarations, changed default params for a <requestHandler>, etc…) and you want to start using them without stopping and restarting your whole Servlet Container.

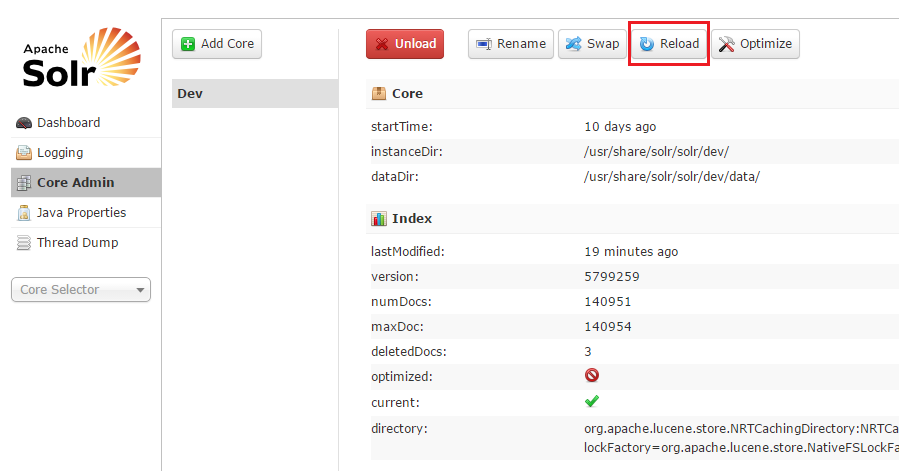
You can also reload a Solr core using the admin portal by going to “Core Admin” -> Click on the core you want to reload -> Click the Reload button as shown in the following screenshot:

Solr Core Reload
Solr Core Reload

Read More How to Achieve Zero-Downtime Sitecore Deployments (Solr Search) – Part II

Scalability Session State Sitecore Solr

Share Button

Is it possible to devise a high-availability architecture using Sitecore that can avoid down time and broken functionality during deployments?

Well, this article discusses the potential problems you may encounter during deployments and proposes a system architecture to achieve this goal.

So, what are the main problems that affect the availability of the website during the deployment?

  1. Code/Markup/Config updates will cause the application pool to restart.
  2. Publishing new sublayouts can be problematic. i.e. publishing the subalyouts before the code and markup are deployed is good enough to get the yellow screen of death.
  3. Rebuilding indexes can cause your search and listing pages to stop working till the rebuild process is complete.

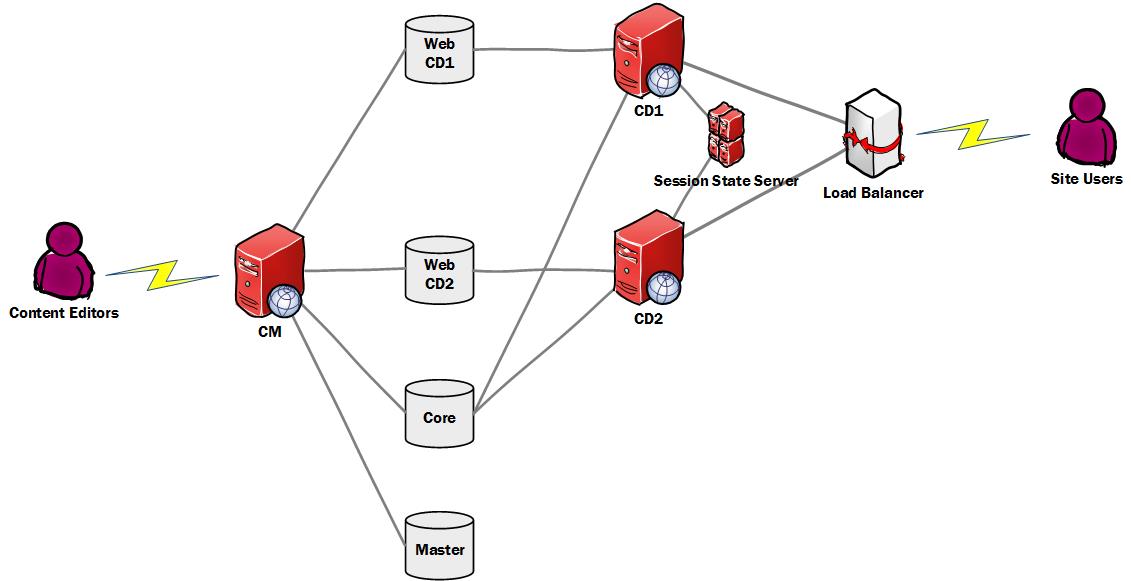
The following architecture describes how address the problems mentioned above to avoid any downtime during the deployment.

The Architecture

System Architecture
System Architecture

This proposed architecture is based on the Multi-Instance environment documented in the Sitecore scaling guide apart from having a Web database per CD server. For simplicity, the diagram illustrates the architecture on only 2 CD servers. However, in the CD servers can scale out as needed based on the performance requirements.

Read More How to Achieve Zero-Downtime Sitecore Deployments (Architecture) – Part I

Scalability Session State Sitecore

Share Button

Most developers use the in-process session state management (InProc) during the build of  any website – including Sitecore builds. Sitecore is configured to use InProc session state by default as it’s required to run the Sitecore client on Content Management (CM) servers, this doesn’t apply to the Content Delivery (CD) servers.

So, if the production environment is a single server setup – i.e. one server per environment that provides both the CM and CD roles – developers can get away with storing non-serializable objects in the session – such as Sitecore Items. The website will work without any problems as the In-Proc setup doesn’t do any serialisation.

If the live environment is architected to scale out, i.e load balanced CD servers with load balancer, you can configure your load balancer to use sticky session. In this case, InProc sessions will suffice. The CD servers won’t need to use out-of-process session management such as StateServer and SqlServer. This is by far the quickest solution for the problem. The only drawback is that some load balancing services won’t be able to provide the same sticky session for both http and https requests. So, if a user is redirected to a secure session, there is no guarantee that the load balancer will keep the user on the same server.

If you cannot use sticky sessions on your CD servers, you will have to configure your application to use out-of-process session state management. Once this is done, every object that your application stores in session, will get serialised before being sent to the state server (e.g. SqlServer). Failing to store serialisable objects in the session will always result in throwing serialisation exceptions.

Maybe you have been lucky enough to work in a project before when none of the Dev, Testing or UAT environment were matching the the Live environment in terms of the architecture, especially when it comes to multiple CD servers and load balancing. Unfortunately, this always happens to reduce the cost of the hosting, maintenance, etc. In such setups, it’s more likely to see errors happening only on the Live environment and the serialisation exceptions are one of these problems.

The problem can be solved easily be just marking all your custom classes using the Serializable attribute. However, what happens if your class contains a property of a non-serilaizble type that’s not yours, e.g. Sitecore Item! Well, straight away you may think that you are screwed and probably you need to change the logic of your application to avoid storing such types in session. In some cases, these changes won’t be trivial, and will require code updates affecting several modules, this will also require running functional and regression testing and perhaps bug fixing that may affect the deadline of the project.

Well, the following workaround may help avoiding a crisis.

Read More Sitecore Items and Session State Management on Multiple CD Servers

Scalability Session State Sitecore

Share Button

Here is the source code of the awesome cars demo site I presented at the Sitecore User Group (Cardiff) on 24/11/2014. This site illustrates how to use Sitecore and Solr…

Read More Awesome Cars Demo Site

Sitecore Solr

Share Button

One essential thing that you will need to do in almost every search implementation is linking each search result item to their full (details) pages. The Sitecore content search provider for Solr doesn’t index the item url by default, here are the steps you need to get it working:

The Sitecore.ContentSearch.SearchTypes.SearchResultsItem base class contains the following property:

[IndexField("urllink")]
public virtual string Url {get; set;}

Consider the following sample code to get the urls of items located under a specific parent:

...
using(var context = index.CreateSearchContext())
{
  var query = context.GetQueryable<SearchResultItem>();
  var pageUrls = query.Where(i => i.Parent == new ID("<ParentItemIdHere>"))
                      .GetResults().Hits.Select(h => h.Document.Url).ToList();
}

Read More Sitecore 7 & Solr – Why SearchResultItem.Url is always null?

Sitecore Solr

Share Button

The Solr search provider in Sitecore 7 works quite well if the search query contains a single term. However, if the search query contains multiple terms, you will need to tweak your code a little bit to get the expected results.

The following codes performs a search using a query that contains a single term.

 var indexName = "sitecore_web_index";
 var index = ContentSearchManager.GetIndex(indexName);
 using (var context = index.CreateSearchContext())
 {
 var query = "paint";
 var dataQuery = context.GetQueryable()
 .Where(i => i.Title == query);
 var results = dataQuery.GetResults().Hits.Select(h => h.Document);
 }

The Sitecore search provider generates the following Solr query:

title_t:(paint)

However, if you replace the

var query = "paint";

With

var query = "purple paint";

The generated Solr query will be:

title_t:("purple paint")

If the search query contains whitespace characters, the search provider will automatically wrap the query terms in double quotes. This will cause Solr to skip the query analysers – such as tokenization and stemming. So, it will only return results containing the string “purple paint” in the title, and will fail to match titles such as “purple-paint”, or “purple and red paint” and so on.

In order to work around the whitespace problem, you can implement one of the following solutions:

Read More Sitecore 7 & Solr – Multi term search

Sitecore Solr